Radiant Floor Heating Guide: Hydronic vs Electric Systems | Projul
Radiant Floor Heating Guide: Hydronic vs Electric Systems
There is something about stepping onto a warm floor on a cold morning that forced-air registers just cannot match. Radiant floor heating has been around in various forms for thousands of years, from Roman hypocaust systems to Korean ondol floors. Modern radiant systems use either hot water tubing or electric heating elements embedded in or under the floor to heat the space from the ground up.
For contractors, radiant floor heating represents a growing market segment driven by homeowners who want better comfort, cleaner aesthetics (no visible registers or baseboard units), and lower energy bills. This guide covers the two main system types, installation methods, design considerations, and the practical knowledge you need to bid and build these systems successfully.
How Radiant Floor Heating Works
The basic principle is simple. Heat radiates upward from the warm floor surface to the people and objects in the room. Unlike forced-air systems that blow warm air from ceiling or wall registers (where it rises to the ceiling first and then gradually mixes down), radiant heat starts at the floor level where people actually live.
This heat distribution pattern means the warmest air is at floor level and the coolest air is at the ceiling, which is the opposite of forced air. The result is that occupants feel comfortable at lower thermostat settings because their feet are warm and the heat is concentrated in the occupied zone rather than pooling at the ceiling.
Radiant floors also eliminate air movement, which means less dust circulation and fewer allergy complaints. For homeowners with allergies or respiratory issues, this is a significant selling point.
Hydronic Radiant Floor Heating
Hydronic systems are the standard for whole-house radiant heating. They circulate warm water (typically 80 to 140 degrees Fahrenheit, depending on the floor type and heat demand) through cross-linked polyethylene (PEX) tubing installed in or under the floor.
System Components
Heat source: A boiler (gas, propane, oil, or electric), a heat pump (air-source or ground-source), or in some cases a solar thermal system with backup heating. Condensing gas boilers are popular because they operate efficiently at the low water temperatures that radiant systems use. Air-source heat pumps are increasingly common, especially in moderate climates, because they provide both heating and cooling capability.
Circulation pumps: Variable-speed ECM (electronically commutated motor) circulators move the water through the system. Modern circulators use very little electricity and automatically adjust their speed to match the flow demand.
Manifold: The central distribution point where supply and return lines from the boiler connect to the individual zone circuits. Manifolds include flow balancing valves, temperature gauges, and fill/drain connections. A well-designed manifold makes commissioning and troubleshooting straightforward.
PEX tubing: The most common tubing is 1/2-inch or 5/8-inch PEX (either PEX-a or PEX-b). PEX is flexible, durable, resistant to freeze damage, and has a long service life (rated for 100+ years in most applications). Oxygen barrier PEX is required for closed-loop systems to prevent corrosion of metal components.
Controls: A system controller manages the boiler or heat pump, circulation pumps, mixing valves (if used), and zone valves based on input from thermostats in each zone. Modern controls can include outdoor reset, which automatically adjusts the supply water temperature based on the outdoor temperature. This saves energy by running lower water temperatures during mild weather.
Installation Methods
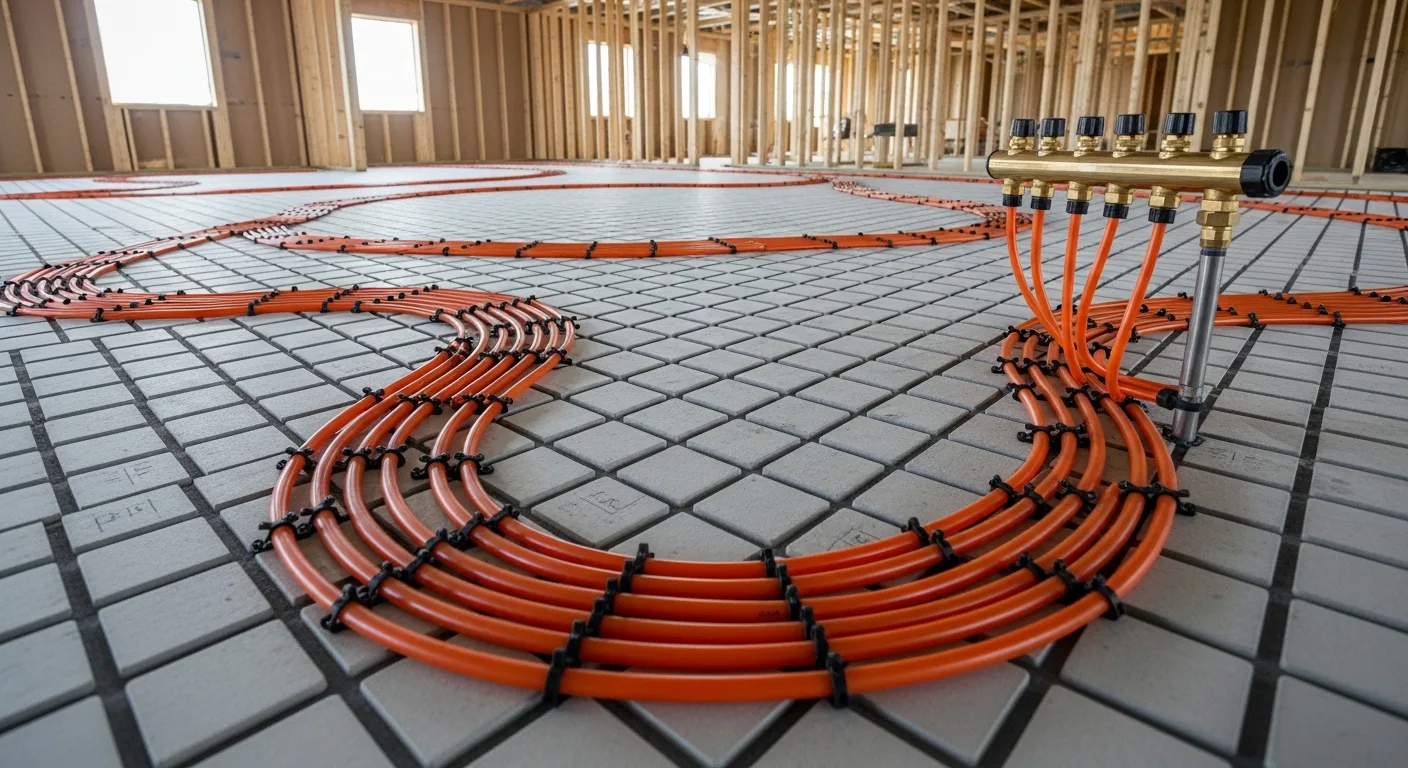
Slab-on-Grade (Embedded in Concrete)
This is the most common and most effective installation method for new construction. The PEX tubing is attached to the reinforcing mesh or secured to the insulation board below the slab, and the concrete is poured directly over it.
Procedure:
- Install rigid foam insulation (minimum R-10, preferably R-15 or higher) under the slab area. This prevents heat from migrating downward into the ground instead of upward into the living space.
- Install the vapor barrier over the insulation.
- Place the wire mesh or rebar for the slab reinforcement.
- Lay out the PEX tubing per the design drawings, securing it to the mesh with zip ties or wire clips at 24 to 36-inch intervals. The typical tube spacing is 6 to 12 inches on center, depending on the heat load calculation.
- Pressure test the tubing system to 50 to 100 psi and hold pressure during the pour to verify no damage occurs.
- Pour the concrete slab, taking care not to damage the tubing with rebar chairs, concrete boots, or vibrators.
- Maintain pressure on the tubing during the pour. If a tube is punctured, you will see the pressure drop and can locate and repair the damage before the concrete sets.
Advantages: Excellent thermal mass stores heat and evens out temperature swings. The most efficient heat transfer because the tubing is in direct contact with the concrete. No additional floor height.
Considerations: The high thermal mass means slower response times. You cannot easily repair tubing after the slab is poured (though PEX failures in concrete are extremely rare). The slab must be properly insulated underneath, or you will heat the ground instead of the house.
Thin-Slab Over Wood Subfloor
For upper floors or renovation projects where you are working over an existing wood subfloor, a poured thin-slab (typically 1.5 inches of gypsum-based or lightweight concrete topping) provides a thermal mass bed for the tubing without the weight of a full concrete slab.
Procedure:
- Install the PEX tubing over the subfloor, secured to the plywood with staples or clips.
- Build a dam at doorways and perimeters to contain the pourable topping.
- Pour the gypsum or lightweight concrete topping to the specified thickness, covering the tubing by at least 3/4 inch.
- Allow the topping to cure per the manufacturer’s instructions before installing the finish floor.
Advantages: Good thermal mass, relatively simple installation, self-leveling topping fills voids and provides a smooth surface for finish flooring.
Considerations: Adds 15 to 20 pounds per square foot of dead load to the floor structure. Verify that the floor framing can handle the additional weight. The added height (1.5 to 2.5 inches) requires transition details at doorways and stairs.
Staple-Up (Below Subfloor)
For retrofit projects where you cannot add height above the subfloor, PEX tubing can be installed from below by stapling it to the underside of the subfloor between the floor joists.
Procedure:
- From the basement or crawl space, staple the PEX tubing to the underside of the subfloor using metal heat transfer plates (also called extruded aluminum plates). These plates spread the heat from the tube across a wider area of the subfloor.
- Install fiberglass or rigid foam insulation below the tubing to push the heat upward.
Advantages: No added floor height. Minimal disruption to the living space above. Works well for retrofit projects.
Considerations: Less efficient than embedded systems because the heat must transfer through the subfloor. The aluminum heat transfer plates significantly improve performance; do not skip them to save cost. Insulation below the tubing is critical.
Designing a Hydronic System
Proper design starts with a room-by-room heat loss calculation. You need to know how many BTUs per hour each room requires to maintain the design temperature on the coldest expected day. This determines:
- Tube spacing: Higher heat demand = closer tube spacing (8 or 9 inches). Lower demand = wider spacing (12 inches).
- Water temperature: Higher heat demand requires higher supply water temperatures. The floor surface temperature should not exceed 85 degrees F for occupied spaces (per ASHRAE guidelines).
- Circuit length: Each circuit should be roughly the same length (200 to 300 feet is typical for 1/2-inch PEX) to ensure balanced flow. Unequal circuits cause uneven heating.
- Zone layout: Group rooms with similar heating needs into zones controlled by a single thermostat.
Most PEX and boiler manufacturers offer free design software or will design the system for you based on your floor plans and heat loss data. Take advantage of these services, especially when you are getting started with radiant installations.
Electric Radiant Floor Heating
Electric radiant systems use resistance heating cables or pre-assembled mats installed directly under the finish floor. They convert electricity directly to heat with nearly 100 percent efficiency at the point of use.
System Components
Heating cable or mat: Available in loose cable (for custom layouts) or pre-spaced mats (for rectangular areas). Cable is installed in a serpentine pattern at a consistent spacing. Mats are rolled out and cut to fit the room shape (you cut the mesh between cables, never the cable itself).
Thermostat: Most electric radiant systems use a programmable thermostat with a floor temperature sensor (embedded in the thinset or slab) in addition to an air temperature sensor. The floor sensor prevents overheating, which protects both the floor covering and the cable.
Dedicated circuit: Electric radiant systems draw significant current. A typical bathroom mat (40 to 60 square feet of heated area) draws 4 to 6 amps at 120V. Larger areas require 240V circuits and may need multiple circuits. Always check the electrical load and panel capacity before specifying an electric system.
Installation Methods
Under Tile (Thinset Method)
The most popular electric radiant installation. The heating cable or mat is embedded in a layer of modified thinset mortar directly under the tile.
Procedure:
- Test the cable or mat with an ohm meter before installation (document the reading).
- Apply a thin layer of modified thinset to the subfloor.
- Press the cable or mat into the thinset, ensuring consistent spacing and no cable overlaps.
- Embed the floor temperature sensor between two cable runs (not on top of a cable).
- Apply the tile setting thinset over the cable and install the tile.
- Test the cable with an ohm meter again after tile installation (document the reading).
- Do not energize the system until the thinset has fully cured (typically 28 days for standard thinset).
Advantages: Adds minimal height (about 1/4 inch). Tile conducts heat well, so the system responds relatively quickly. Simple installation for experienced tile contractors.
Under Laminate or LVP (Dry Installation)
Some electric radiant products are designed for dry installation under floating floors. The heating element is placed between the subfloor and an insulating underlayment, with the floating floor installed on top.
Advantages: No thinset, no cure time. The floor can be walked on immediately.
Considerations: Less efficient heat transfer than the thinset method because the air space and underlayment act as partial insulators.
In Concrete Slab
Electric heating cable can be embedded in a concrete slab, similar to hydronic tubing. This is less common but used in some commercial applications like warehouse floors, loading docks, and snow melt systems for exterior slabs and driveways.
When to Choose Electric vs Hydronic
Choose electric when:
- Heating a single room (bathroom, kitchen, entryway)
- Retrofit project where running PEX is impractical
- No existing boiler or hydronic infrastructure
- Budget is limited for a small area
- Supplemental heating (the room has another primary heat source)
Choose hydronic when:
- Whole-house heating
- New construction with slab-on-grade
- Operating cost is a priority (electricity is expensive in your area)
- Large total heated area (the economy of scale favors hydronic)
- You want to integrate with solar thermal or a heat pump
Energy Efficiency and Operating Costs
Radiant floor heating is more energy efficient than forced-air heating for several reasons:
No duct losses. Forced-air systems lose 25 to 35 percent of their energy through leaky and poorly insulated ductwork, especially in unconditioned attics and crawl spaces. Radiant systems have no ducts.
Lower supply temperatures. Hydronic radiant systems operate at 80 to 140 degrees F supply water temperature, compared to 120 to 180 degrees F for baseboard hot water systems and 120 to 140 degrees F for forced-air furnace supply air. Lower temperatures mean the heat source operates more efficiently, especially condensing boilers and heat pumps.
Lower thermostat settings. Because radiant heat warms people directly and keeps the warmest air at floor level, occupants typically set the thermostat 2 to 4 degrees lower than they would with forced air while maintaining the same comfort level. Every degree of thermostat reduction saves approximately 3 percent on heating costs.
Zoning. Radiant systems are naturally zoned, so you only heat the rooms that need it. Forced-air systems can be zoned, but it requires motorized dampers and additional controls that many installations lack.
Typical Operating Cost Comparison
For a 2,000 square foot home in a cold climate (6,000 heating degree days):
| System Type | Annual Heating Cost |
|---|---|
| Forced-air gas furnace (80% AFUE) | $1,800 - $2,400 |
| Hydronic radiant with condensing boiler (95% AFUE) | $1,200 - $1,600 |
| Hydronic radiant with air-source heat pump (COP 3.0) | $800 - $1,200 |
| Electric radiant (whole house, $0.12/kWh) | $2,400 - $3,600 |
These are rough estimates and vary significantly by fuel costs, climate, insulation levels, and system design. The takeaway is that hydronic radiant with an efficient heat source provides the lowest operating cost, while electric radiant for whole-house heating is expensive in most areas.
Common Mistakes and How to Avoid Them
Skipping the heat loss calculation. Do not guess at tube spacing or system sizing. An undersized system will not keep the house warm on the coldest days. An oversized system wastes money and can overheat the floor.
Forgetting the insulation. A radiant slab without insulation underneath heats the earth as much as the house. This is like running your furnace with the windows open. Install minimum R-10 rigid foam under every heated slab.
Wrong floor covering. Thick carpet and pad over radiant heating is like putting a blanket over your radiator. Discuss floor covering choices with the homeowner early in the design process so you can adjust the system output accordingly.
Inconsistent circuit lengths. Circuits that vary significantly in length will have different flow rates, causing uneven heating across zones. Keep circuits within 10 percent of the same length.
No pressure testing during concrete pour. If you do not have the tubing pressurized when the concrete truck arrives, you will not know about a punctured tube until you try to commission the system months later. By then, the repair is much harder and more expensive.
Selling Radiant Floor Heating to Homeowners
If you are a contractor looking to add radiant heating to your service offerings, here are the selling points that resonate with homeowners:
Comfort. Warm floors feel great. Let them experience a heated floor in your showroom or a completed project. The comfort sells itself.
Clean heat. No dust blowing around, no dry air, no hot and cold spots.
Quiet. No fan noise, no duct rattling.
Invisible. No baseboard units, no registers, no ductwork chases eating up wall space.
Energy savings. Lower operating costs, especially with a high-efficiency heat source.
Property value. Radiant heating is a premium feature that homeowners recognize.
Tracking your radiant heating projects from estimate through completion is easier with the right tools. Projul’s project management features help you manage the coordination between the plumber, electrician, concrete contractor, and finish flooring installer that these projects require. See pricing options to find the plan that fits your business.
Getting Started
Radiant floor heating is not complicated, but it does require proper design, quality materials, and careful installation. Start with manufacturer training (most PEX and boiler manufacturers offer free training for contractors), invest in a heat loss calculation tool, and begin with straightforward projects like slab-on-grade homes before tackling complex multi-zone retrofit work.
The demand for radiant heating is growing as homeowners prioritize comfort and energy efficiency. Contractors who can design and install these systems well have a real competitive advantage in the residential market.
If you need help organizing your radiant heating projects and keeping track of the multiple trades and phases involved, schedule a demo with Projul to see how our project management platform works for specialty contractors.
Frequently Asked Questions
What is the difference between hydronic and electric radiant floor heating?
How much does radiant floor heating cost to install?
Can you install radiant floor heating under hardwood floors?
How thick is a radiant floor heating system?
How long does it take for radiant floor heating to warm up a room?
Does radiant floor heating work with all floor coverings?
Is radiant floor heating more energy efficient than forced air?
Can you install radiant floor heating in an existing home without tearing up the floor?
Related Articles

Construction Punch List Software Comparison Guide: What Actually Matters
Not all punch list software is built the same. This guide breaks down what construction companies should actually look...
Read More →
Concrete Saw Cutting Guide: Wet vs Dry, Blade Selection, Depth Control, and Joint Timing
Concrete saw cutting is one of those skills that separates a clean, professional slab from one that cracks in all the...
Read More →
Fire Sprinkler System Installation: Wet vs Dry Systems, Pipe Sizing, and Code Requirements
Fire sprinkler systems are one of those building components that nobody thinks about until they are needed. But for...
Read More →